To set up Jellyfin, install the free Jellyfin server on an always-on computer, NAS or Docker host, add and name your media libraries, enable hardware transcoding in the dashboard, and configure remote access yourself. Everything is free and open-source, including hardware transcoding that Plex charges for. This guide covers the hardware, library organisation, free hardware transcoding and remote access. For the full app assessment, see our Jellyfin review.
Before You Start
You need a media server host that stays on, storage, and a network. Jellyfin’s free hardware transcoding rewards a supported CPU/GPU:
| Component | Minimum | Recommended |
|---|---|---|
| Host | PC, Mac, Linux, NAS or Docker | Mini-PC or NAS, always on |
| CPU/GPU | Any (software transcode) | Intel Quick Sync / NVIDIA NVENC |
| Storage | Enough for your media | NAS with redundancy (RAID) |
| Network | Wi-Fi | Wired Ethernet to the server |
| Cost | Free — no account needed | Free (only your hardware) |
Step-by-Step
- Install the Jellyfin server. Use the installer for your OS, a NAS package, or a Docker container. It runs entirely on your own hardware — no account, no cloud.
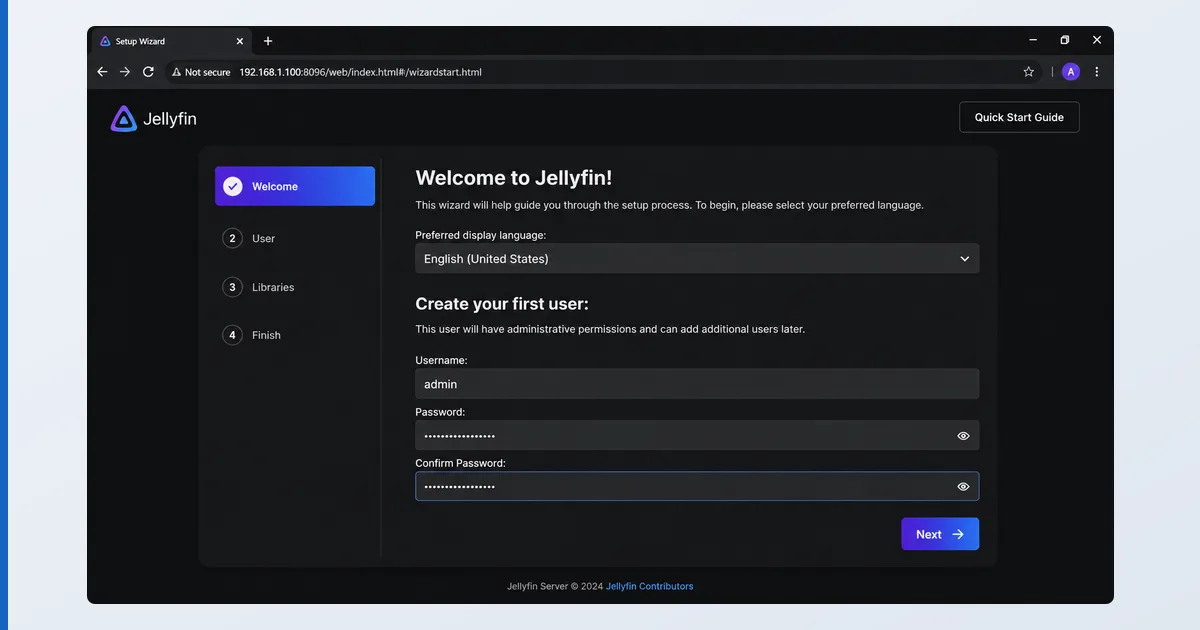
- Run the first-time wizard. Create your administrator user and set the language.
- Add your libraries. Add Movies and TV Shows libraries pointing at cleanly named folders —
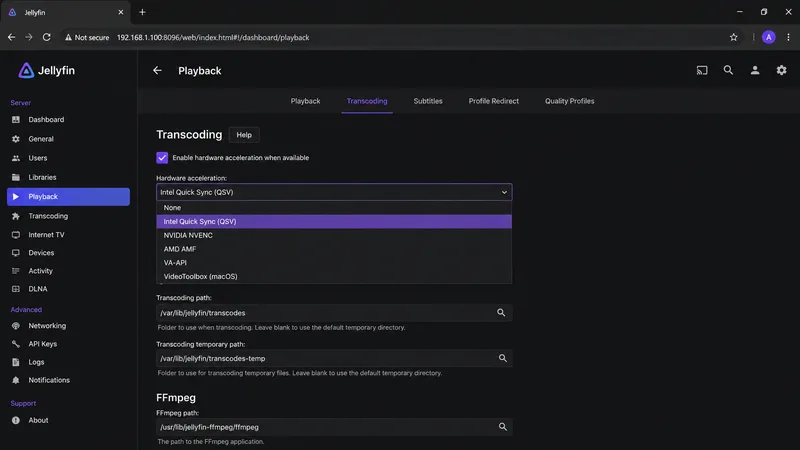
Film (Year)andShow/Season 01/Show - S01E02— so metadata matches correctly. - Enable hardware transcoding. In Dashboard → Playback → Transcoding, pick your acceleration method (QSV, NVENC, VAAPI) and enable supported codecs — free, unlike Plex.
- Configure remote access. Forward port 8096, or set up a reverse proxy with HTTPS, or use a VPN/Tailscale for private access.
- Install client apps and test. Use the official app on your TV device (or a client like Findroid/Swiftfin) and confirm playback.
Direct Play vs Transcoding
As with any server, direct play — the client playing your file as-is — is lightest. Transcoding converts on the fly for incompatible devices or slow links. Jellyfin’s advantage is that hardware transcoding is free, so once enabled, a supported CPU/GPU handles even 4K conversion without cost. Store device-friendly formats to keep most playback direct.
Troubleshooting
| Problem | Likely cause | Fix |
|---|---|---|
| Can’t reach server | Wrong address / firewall | Use the host IP:8096; allow it through the firewall |
| Wrong artwork/title | File naming | Rename to Title (Year); refresh metadata |
| Transcoding is slow | Hardware accel off | Enable QSV/NVENC in Dashboard → Playback |
| Remote access fails | Port not forwarded | Forward 8096, or use a reverse proxy / VPN |
| Client app issues | Third-party client | Try the official app or a maintained client |
The Bottom Line
Jellyfin takes a little more effort than Plex, but the payoff is a completely free, open-source and private server — with hardware transcoding included at no cost. Install it, add cleanly named libraries, enable acceleration, and set up remote access to taste. See the full Jellyfin review, compare it with Plex vs Jellyfin, pick hardware in our best device for Plex guide (it runs Jellyfin too), understand the tech in our transcoding explainer, and look up any term in the streaming glossary.